DevLog: Orange Sentry Init
Orange Sentry project
Welcome to the .init devlog of the Orange Setry project!
What is it
As you may have seen on the project page or the README on the GitHub repo (by the way, go give those a read!), Orange Sentry is a “low-cost embedded IoT honeypot and IDS system designed by a security people for security people”. Although it certainly is (or aims to be) that, it is also many things more.
Firstly, it contains a minimal and security hardened image of DietPi that works really well on Orange Pi Zero 3 devices, that is easily extensible and hackable if you know your way around a Linux terminal (and your invitation to learn if you don’t!).
It also contains many useful util programs and c99 libraries that you may find useful if you are trying to work with Orange Pi devices.
But most important of all, it is a passion project. A way for this Computer Engineering student and (certified) Cybersecurity Nerd to explore and learn more deeply many concepts, technologies and processes vital to IoT (and general computer) engineering. Call it learning the Tools of the Trade, tecnical stuff like:
- C and Python programming beyond “computer programming 101” courses;
- Secure, reliable, fast and sd card-safe IPC;
- Peripheral device control in kernel and user space & I2C;
- Secure memory management; and
- Network programming, especially MQTT.
But also less technical stuff, like:
- Project Management;
- Product vision; and
- Scope and time management.
Join me in this journey, where I try to finish as much of this before march, and hopefully become a better developer for it!
The architecture
Beware! many of the technical details for this project have changed since when it was born as an idea in my mind, and are subject to change because of many reasons, including change in scope, the time I have to allocate to this project, which tools i currently have at hand, etc. The overall architecture should not change much, but in any case, always consult the latest devlog posted and the project page to get the latest and most accurate information!
My goals with this project (technical requirements, if you will) were to create a physical honeypot device that is:
- Portable & configurable on-site without the need for external access via another computer for the most common tasks;
- Lightweight;
- Extensible and hackable (on the original sense of the word);
- As hardened as feasible;
- to keep things simple; and
- To maximize my learning along the way.
Because of the structure and the hardware I have chosen, my main limitations are:
- Relatively tight memmory footprint. 2gb is plenty, especially for well optimised embedded applications, but I will be running a couple of python apps and also suricata, which is heavy. Therefore I always have to think about performance optimization steps. Nothing crazy, but focusing on the 20% will help a lot
- Disk writes. I don’t want to brick my SD card., it was expensive lol. Also good for stability and to facilitate turning the filesystem read only for security and to prevent data corrpution on the SD card.
- Complexity. I want to ship this alpha before march.
Because of this, I landed on and architecture based on a main controller, which is based on a Finite State Machine (FSM) logic, with each state, referred to as working modes, having different functionalities within their main functioning loop and use cases:
| Mode | Explanation | Use Case |
|---|---|---|
| Closed | Closes all network connection and ports. The board will be able to be configured only via the physical HMI | For initial configuration and setup, especially in known hostile networks. |
| Passive Listen | Engages Suricata to listen on all ports, but does not act and drops every attempted connection. Keeps MQTT running but will not accept new connections | Useful for scouting and monitoring a network, especially in low power contexts. |
| Honeypot | Engages the Cowrie honeypot alongside Suricata to capture malicious traffic. Generates alerts wehn accessed and when “danger” commands are typed | The full functionality of the board. Useful for threat intelligenge and malware research. |
| Developent | Enables SSH access on a random, high port. WIll display the IP and port it has opened on the screen or will publish it via MQTT to an authenticated broker. Also maybe disable the read only filesystem so you cna modify stuff. | Useful for development and configuration, especially deploying new tools on the device. |
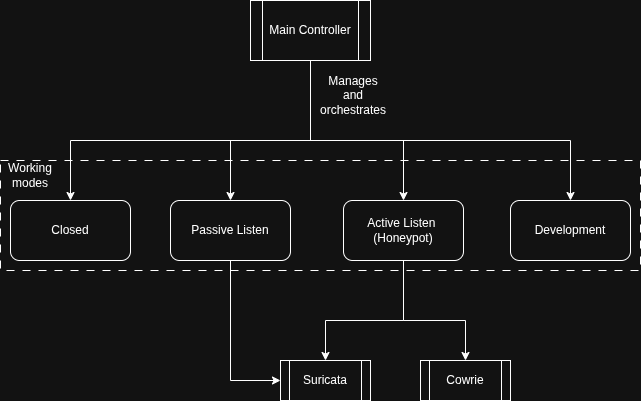
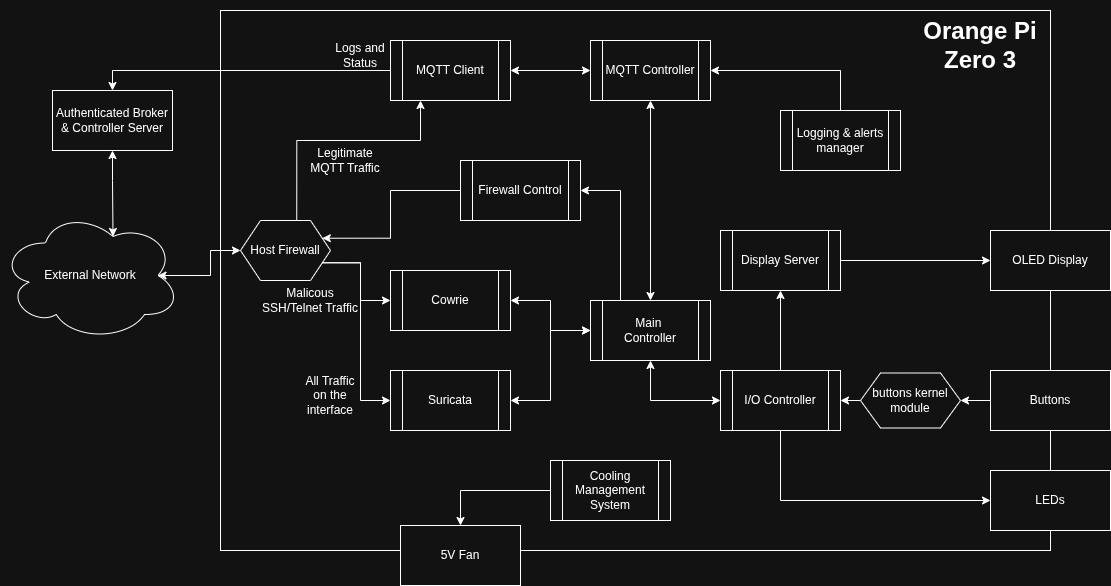
Alongside the main controller, the MQTT controller, MQTT Client, firewall controller, and I/O Controller and the Logging and Alerts manager all compose the cntrol pane of the device, and is meant to provide all of the control and communication functionality
The enforcement plane, composed of Cowrie and Suricata, the host firewall, the cooling system, the display server and actuator for the buttons and other assorted functionalities, are the main meat of the board, actually providing the execution functions that the control plane lacks.
The Roadmap
I have planned to develop this board in a in “incremental slices” manner, focusing on delivering small parts of the functionality one at a time. I have also called out certain milestones, meaning they are when my project reaches alpha or beta status, nd then my focus will shift from new features to maturing and stabilizing the existing code and architecture, and also imporving security and QoL/UX for the users.
Milestone 0: Pre-Alpha (Infrastructure)
- MVP 0: Initial Setup (DietPi, Cowrie Service, Control Plane Stub).
- MVP 1: Hardware Interaction (Physical Buttons & LED Feedback). *
- MVP 1.5: Cross-Compilation Toolchain & Build System.
- MVP 2: Control Plane Connectivity (MQTT Client).
- MVP 3: Security Hardening (TLS for MQTT).
- MVP 4: FSM Orchestration (Linking Hardware Inputs to System State).
Milestone 1: Alpha (Device Reliability)
Focus: Local Persistence, Hardware Watchdog, Thermal Management, and Crash Recovery.
Milestone 2: Beta (Ecosystem)
Focus: Webapp Backend, Fleet Management (IaC), and Auto-Enrollment.
- This milestone is very dependent on when i get my hands on the physical components, so the timing of when I will develop it is variable.
What have I already done
I have already bought the board and SD card. I also had the push buttons, and a protoboard for prototyping.
I have also already configured the OS to 90% of what I think I will need (I am certain that a few more configurations will pop up along the way), installed Cowrie and made it work as a systemd service, and have already started to setup a proper build system
What am I doing curently
Figuring out the rest of the build system and improving overall project vision and organization.
Also I have already started to build the MQTT CLient.
What do I plan to do
I plan to develop the MQTT client further, until it is stable enough I can call it done. Then the MQTT controller and a logging management service to control the sending of logging information smartly.
Also I have already started to save money to buy the physical components I sill need (cooling fan, OLED Screen, heatsink, etc.)
Conclusion
I am very hopeful for the future of this project. I think it has great potential of not only teaching me to be a better Security Practitioner and Computer Engineer(ing Student), but also may help some like-minded people with their own projects.
Man, I Love Computers!